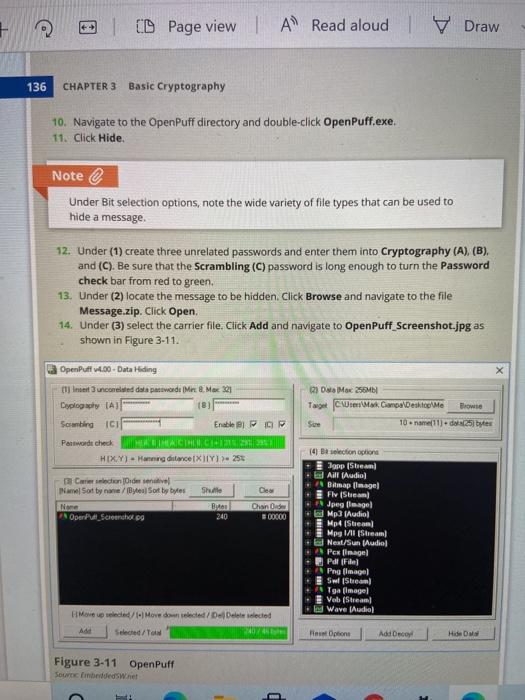
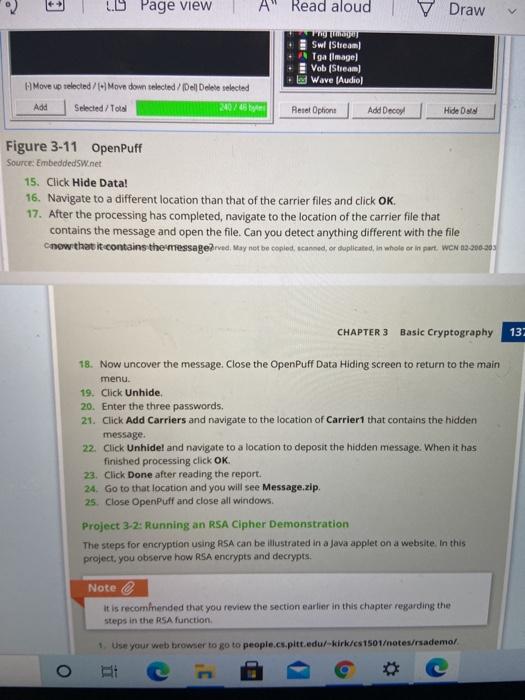
wser? Set as default ID Page view l A Read aloud IV Draw Project 3-1: Using OpenPuff Steganography Unlike cryptography that scrambles a message so that it cannot be viewed, steganography hides the existence of the data. In this project, you use OpenPuff to create a hidden message. 1. Use your web browser to go to embeddedsw.net/OpenPuff_Steganography Home .html Note It is not unusual for websites to change the location of where files are stored. If the URL above no longer functions, open a search engine and search for "OpenPuff". 2. Click Manual to open the OpenPuff manual. Save this file to your computer. Read through the manual to see the different features available. 3. Click OpenPuff to download the program 4. Click Screenshot to view a screen capture of OpenPuff. Right-click on this image and save this image OpenPuff_Screenshot.jpg to your computer. This will be the carrier file that will contain the secret message. Note e For added security OpenPuff allows a message to be spread across several carrier files. S. Navigate to the location of the download and uncompress the zip file on your computer 6. Now create the secret message to be hidden. Open Notepad and enter This is a secret message: 7. Save this file as Message.txt and close Notepad. B. Create a Zip file from the Message file. Navigate to the location of this file through Windows Explorer and click the right mouse button. 9. Click Send to and select Compressed (zipped) folder to create the zip file. 2018 Caming. All Rights Reserved. May not be cold and or duplicated, in whole or in port WON 02-200-201 36. CHAPTER Rasie Cronterande 19 6 CD Page view | A Read aloud | Draw 136 CHAPTER 3 Basic Cryptography 10. Navigate to the OpenPuff directory and double-click OpenPuff.exe. 11. Click Hide. Note Under Bit selection options, note the wide variety of file types that can be used to hide a message 12. Under (1) create three unrelated passwords and enter them into Cryptography (A) (B). and (C). Be sure that the Scrambling (C) password is long enough to turn the Password check bar from red to green. 13. Under (2) locate the message to be hidden Click Browse and navigate to the file Message.zip. Click Open, 14. Under (3) select the carrier file. Click Add and navigate to OpenPuff Screenshot.jpg as shown in Figure 3-11. OpenPuff 1.00. Data Hiding Intet uncond data pested Mr & Max 1 Dyplogacy (AT Scrambling cl Erable PC Parwordi check TACTIC HIXX) - Haming distance XY ) 25 Dal Mor 256MB Target CM Campo Desktop Me Browse Sure 10 name(11) 25 bytes Shulle Cea Creaction de tenie INSort by nane/Byte Sort by byles Nome Open Screencha og Chand 300000 240 14) Blon options opp (Stream a Aill (Audio) Bitmap Image Flv (Stream Jpeg sagel Mp3 Audio Mp4 (Stream Mpg 1/1 Stream la Neat/Sun Audio Pen magel + Pdl File Pne ilmage) Sul (Stream To (image Veb (Stream) Wave (Audio) Move ovlece/Mave ded/DeDelete selected Adel Selected to Hoptions Add Decor Hide Figure 3-11 OpenPuff SouvenbeddedWinet LD Page view A Read aloud Draw A Swl (Stream Tga (image Vob (Stream) w Wave (Audio) A Move up elected / Move down selected / Dell Delete selected Add Selected/Total 240/45 Reset Ophone Add Decoy Hide De Figure 3-11 OpenPuff Source: Embedded SW.net 15. Click Hide Data! 16. Navigate to a different location than that of the carrier files and click OK. 17. After the processing has completed, navigate to the location of the carrier file that contains the message and open the file. Can you detect anything different with the file Cnow that it contains the messageDrved, may not be copied, scanned, er duplicated, in whole or in part WCN 12-200-203 CHAPTER 3 Basic Cryptography 137 18. Now uncover the message. Close the OpenPuff Data Hiding screen to return to the main menu. 19. Click Unhide 20. Enter the three passwords, 21. Click Add Carriers and navigate to the location of Carrier1 that contains the hidden message. 22. Click Unhidel and navigate to a location to deposit the hidden message. When it has finished processing click OK. 23. Click Done after reading the report. 24. Go to that location and you will see Message.zip 25. Close OpenPuff and close all windows Project 3-2: Running an RSA Cipher Demonstration The steps for encryption using RSA can be illustrated in a Java applet on a website. In this project, you observe how RSA encrypts and decrypts. Note It is recommended that you review the section earlier in this chapter regarding the steps in the RSA function 1. Use your web browser to go to people.cs.pitt.edu/-kirk/s1501otes/rsademo/ n