Question
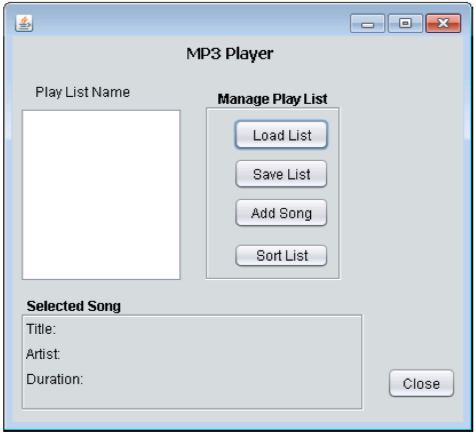
you will be building a GUI for an MP3 Player Application.. You will create the main GUI frame pictured below using the Swing library. Create
you will be building a GUI for an MP3 Player Application.. You will create the main GUI frame pictured below using the Swing library. Create a project named lab5gui.
You will need to add the jar file included with this repository to your project library in order to use the premade PlayList and Song objects.. You will also have to import the classes using import lab3p1spr2012_1.*;.
Playlist
This class will consists of the following properties: name:String, songs:ArrayList and creationDate: String. You have already several methods for this class.
PlayerFrame
Use the Netbeans GUI editor to create a JFrame named PlayerFrame by right clicking your package name and selecting new->JFrame Form. Drag and drop the the controls shown in the figure above. The etched squares are JPanels that have their border property set to etched. Add an instance variable of type PlayList to the class. Make sure you right click the controls and give them appropriate variable names. Double clicking the control will add an event handler where you can then insert code to implement the appropriate action. For example, double clicking the Load List button should allow the user to select a file and then pass the selected file pathname string to loadPlayList method of the PlayList class.

Constructor - The PlayerFrame constructor should be changed to include a formal parameter of type PlayList. You should assign the parameter to the PlayList the instance variable of type PlayList. Your other event handler methods will manipulate the PlayList instance variable.
main() - Netbeans will automatically include a main() method as part of the JFrame Form. You should just comment out this main and use the one created as part of your new project (using either main would have been ok).
JList
To create the event handler for the JList control, right click then select Events. Next select ListSelected- >valueChanged.
To retrieve which item was clicked in the list, use the getSelectedIndex() method. You will need to use this method in order to display the information about the clicked song in the Selected Song panel.
To transfer the items from your ArrayList to the JList, create a temporary String array and then copy the song titles in the ArrayList to the temporary array. You can then call the setListData method with the temporary array as the actual parameter to get the titles displayed in the JList.
Note: Right click the project lib folder and select add library, then select the absoluteLayout lib at the top. This will help you keep things lined up when creating your GUI.
Command-Line Arguments
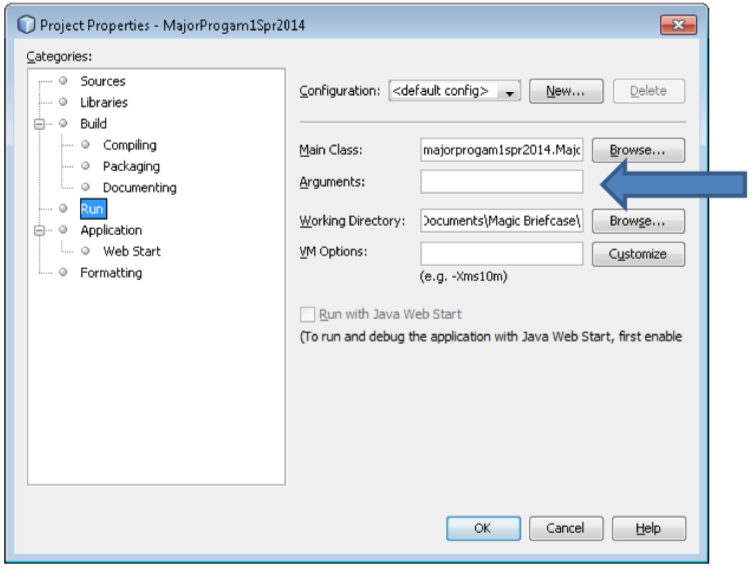
Before instantiating the PlayerFrame object as described in Lab3, your application should first retrieve the input file name that will be used to preload the PlayList object that is sent to your Lab4gui constructor. The args parameter to the main() method will contain the name of the inputfile in the indexed variable args[0]. Netbeans allows you to send command-line arguments to your program by going to run->Project Configuration->Customize and typing in the name of the input file in the Arguments: text box. You should now have your main to instantiate a PlayList object and call the method that loads a play list file. Instantiate the PlayerFrame object now with the PlayList object as the constructor parameter. You will also have to set the visibility property of the PlayerFrame like you did in the last lab.

kbjams3.txt file:
KB Jams 01/01/2012 Repect Aritha Franklin 182 Since I Fell for You Jimmy Smith 256 Green Onions Booker T. & the MG's 174 One Nation Under the Groove (Instrumental) Parliament Funkadelic 347 I'd Rather Be With You Bootsy Collins 294 Alpha and Omega Israel & New Breed 351 Nobody Greater VaShawn Mitchell 397
Step by Step Solution
There are 3 Steps involved in it
Step: 1

Get Instant Access to Expert-Tailored Solutions
See step-by-step solutions with expert insights and AI powered tools for academic success
Step: 2

Step: 3

Ace Your Homework with AI
Get the answers you need in no time with our AI-driven, step-by-step assistance
Get Started


