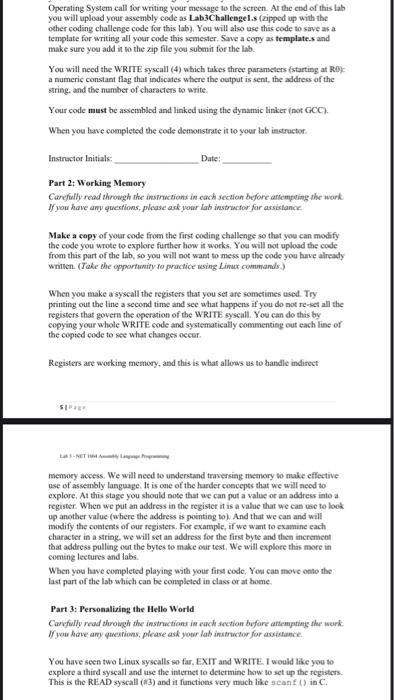
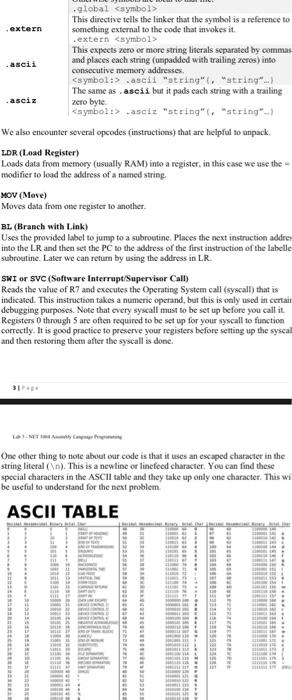
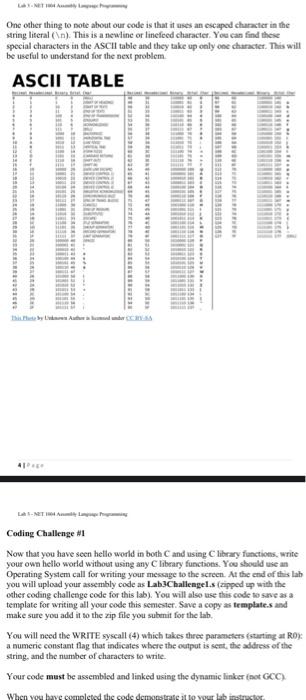
Question: Read the entire lab instruction before starting This lab is to be completed on BrightSpace any lab worksheets handed in will be discarded. Carefully follow
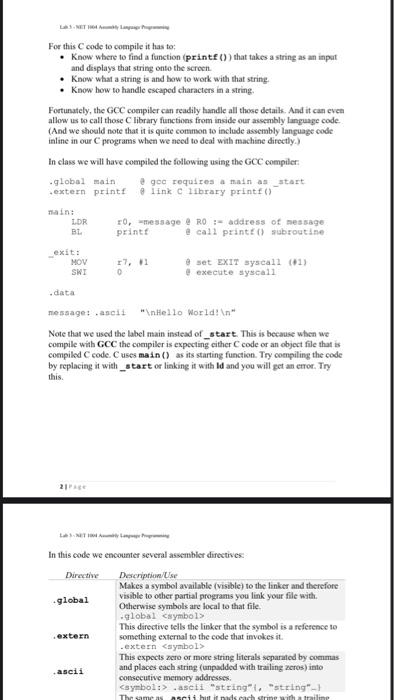
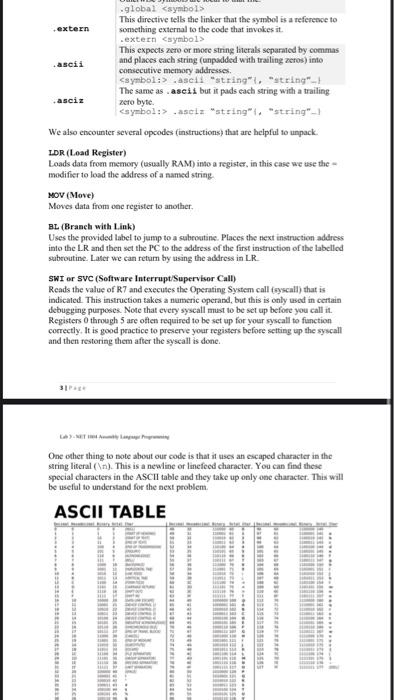
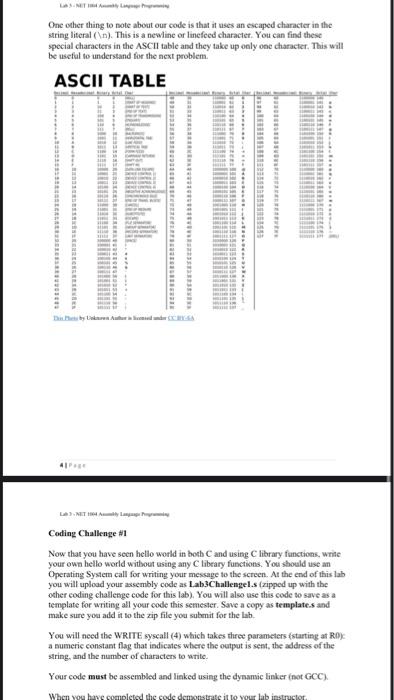
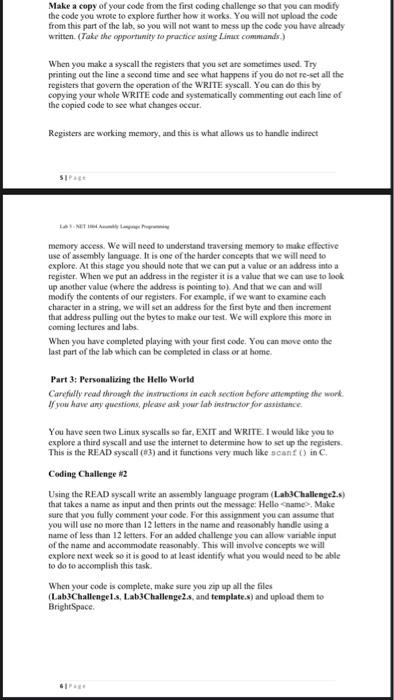
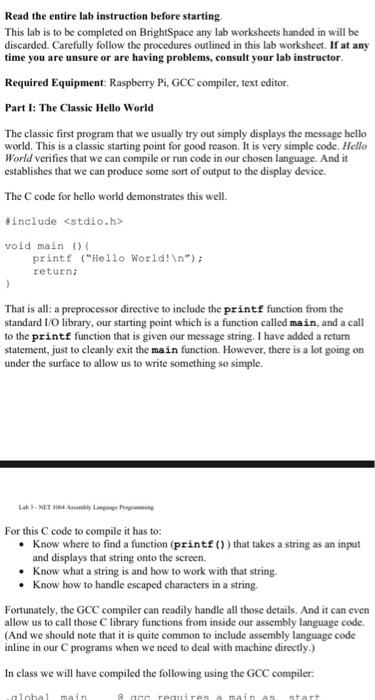
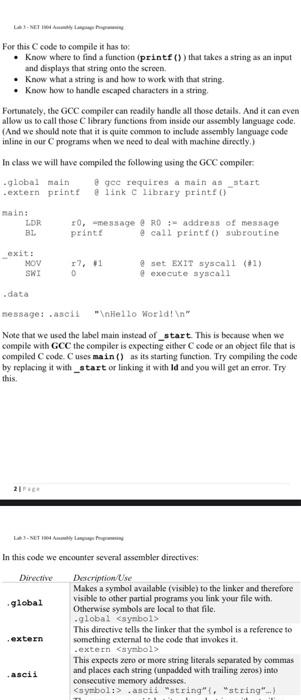
Read the entire lab instruction before starting This lab is to be completed on BrightSpace any lab worksheets handed in will be discarded. Carefully follow the procedures outlined in this lab worksheet. If at any time you are unsure or are having problems, consult your lab instructor. Required Equipment: Raspberry Pi, GCC compiler, text editor. Part I: The Classic Hello World The classic first program that we usually try out simply displays the message hello world. This is a classic starting point for good reason. It is very simple code. Hello World verifies that we can compile or run code in our chosen language. And it establishes that we can produce some sort of output to the display device. The C code for hello world demonstrates this well. #include void main 04 printf ("Hello World! "); return; That is all: a preprocessor directive to include the printf function from the standard I/O library, our starting point which is a function called main, and a call to the printf function that is given our message string. I have added a return statement, just to cleanly exit the main function. However, there is a lot going on under the surface to allow us to write something so simple. For this C code to compile it has to: Know where to find a function (printf()) that takes a string as an input and displays that string onto the screen. Know what a string is and how to work with that string. know how to handle escaped characters in a string, Fortunately, the GCC compiler can readily handle all those details. And it can even allow us to call those C library functions from inside our assembly language code. (And we should note that it is quite common to include assembly language code inline in our programs when we need to deal with machine directly.) In class we will have compiled the following using the GCC compiler: lhal main cereres maina start For this code to compile it has to: know where to find a function (printf()) that takes a string as an input and displays that string onto the screen. know what a string is and how to work with that string, know how to handle escaped characters in a string, Fortunately, the GCC compiler can readily handle all those detaik. And it can even allow us to call those library functions from inside our assembly language code (And we should note that it is quite common to include assembly language code inline in our programs when we need to deal with machine directly.) in class we will have compiled the following using the GCC compiler: global main e gee requires a main as_start extern print link library print) nain: LDR 10,-message @ RO - address of message BL print e call printe) sabroutine exit: MOV 17,1 set EXIT syscall (01) SWZ O execute syscall data message: ascit " Hello world! " Note that we used the label main instead of_start. This is because when we compile with GCC the compiler is expecting cither code or an object file that is compiled code. Cuses main() as its starting function. Try compiling the code by replacing it with _start or linking it with lid and you will get an error. Try this In this code we encounter several assembler directives Dirth Descriptions Makes a symbol available (visible) to the linker and therefore global visible to other partial programs you link your file with, Otherwise symbols are local to that file. global symbol This directive tells the linker that the symbol is a reference to extern something external to the code that invokes it. extern .ascti "string" i "string"-1 The same as schuld each come with a railine global .ascia "string". "string") We also encounter several opcodes (instructions that are helpful to unpack. LDR (Load Register) Loads data from memory (usually RAM) into a register, in this case we use the modifier to load the address of a named string MOV (Move) Moves data from one register to another. BL (Branch with Link) Uses the provided label to jump to a subroutine. Places the next instruction address into the LR and then set the PC to the address of the first instruction of the labelled subroutine. Later we can retum by using the address in LR. SWI or SVC (Software Interrupt/Supervisor Call) Reads the value of R7 and executes the Operating System call (ayscall) that is indicated. This instruction takes a numeric operand, but this is only used in certain debugging purposes. Note that every syscall must to be set up before you call it. Registers through 5 are often required to be set up for your syscall to function correctly. It is good practice to preserve your registers before setting up the syscall and then restoring them after the syscall is done One other thing to note about our code is that it uses an escaped character in the string literal(n). This is a newline or linefeed character. You can find these special characters in the ASCII table and they take up only one character. This will be useful to understand for the next problem ASCII TABLE One other thing to note about our code is that it uses an escaped character in the string literal (n). This is a newline or linefeed character. You can find these special characters in the ASCII table and they take up only one character. This will be useful to understand for the next problem. ASCII TABLE Coding Challenge #1 Now that you have seen hello world in both and using C library functions, write your own hello world without using any library functions. You should use an Operating System call for writing your message to the screen. At the end of this lab you will upload your assembly code as Lab3Challengel.s (zipped up with the other coding challenge code for this lab). You will also use this code to save as a template for writing all your code this semester. Save a copy as templates and make sure you add it to the zip file you submit for the lah You will need the WRITE syscall (4) which takes three parameters (starting at RO) a numeric constant flag that indicates where the output is sent, the address of the string, and the number of characters to write. Your code must be assembled and linked using the dynamic linker (net GCC) When you have completed the code demonstrate it to your lab instructor Operating System call for writing your message to the screen. At the end of this lab you will upload your assembly code as Lab3Challengels (zipped up with the other coding challenge code for this lab). You will also use this code to save as a template for writing all your code this semester. Save a copy as templates and make sure you add it to the zip file you submit for the lab You will need the WRITE syscall (4) which takes three parameters starting at RD a numeric constant flag that indicates where the output is sent the address of the string, and the number of characters to write Your code must be assembled and linked using the dynatric linker (not GCC) When you have completed the code demonstrate it to your lab instructor Instructor Initials Date: Part 2: Working Memory Carefully read through the instructions in each section before attempting the work If you have any questions, please ask peer lab instructor for assistance Make a copy of your code from the first coding challenge so that you can modify the code you wrote to explore further how it works. You will not upload the code from this part of the lab, so you will not want to mess up the code you have already written (Take the opportunity to practice using Limur commands When you make a syscall the registers that you set are sometimes used. Try printing out the line a second time and see what happens if you do not re-set all the registers that govern the operation of the WRITE syscall. You can do this by copying your whole WRITE code and systematically commenting out cach line of the copied code to see what changes occur Registers are working memory, and this is what allows us to handle indirect memory access. We will need to understand traversing memory to make effective use of assembly language. It is one of the harder concepts that we will need to explore. At this stage you should note that we can put a value of an address into a register. When we put an address in the register it is a value that we can use to look up another value (where the address is pointing to). And that we can and will modify the contents of our registers. For example, if we want to examine each character in a string, we will set an address for the first byte and then increment that address pulling out the bytes to make our test. We will explore this more in coming lectures and labs. When you have completed playing with your first code. You can move onto the last part of the lab which can be completed in class or at home. Part 3: Personalizing the Hello World Carefully read through the instructions in each section before attempting the work If you have any questions, please ask your las instructor for assistance You have seen two Linux syscalls so far, EXIT and WRITE. I would like y you to explore a third syscall and use the internet to determine how to set up the registers This is the READ syscall (13) and it functions very much like scanf() in C Make a copy of your code from the first coding challenge so that you can modify the code you wrote to explore further how it works. You will not upload the code from this part of the lab, so you will not want to mess up the code you have already written. (Take the opportunity to practice using Linux commands) When you make a syscall the registers that you set are sometimes used. Try printing out the line a second time and see what happens if you do not re-set all the registers that govern the operation of the WRITE syscall. You can do this by copying your whole WRITE code and systematically commenting out each line of the copied code to see what changes occur. Registers are working memory, and this is what allows us to handle instirect SIP memory access. We will need to understand traversing memory to make effective use of assembly language. It is one of the harder concepts that we will need to explore. At this stage you should note that we can put a value of an address into a register. When we put an address in the register it is a value that we can use to look up another value (where the address is pointing to). And that we can and will modify the contents of our registers. For example, if we want to examine cach character in a string. We will not an address for the first byte and then increment that address pulling out the bytes to make our test. We will explore this mate in coming lectures and labs When you have completed playing with your first code. You can move onto the last part of the lab which can be completed in class or at home Part 3: Personalizing the Hello World Carefully read through the instructions in each section before artempting the work If you have any questions, please ask your lab instructor for assistance You have seen two Linux syscalls so far, EXIT and WRITE. I would like you to explore a third syscall and use the internet to determine how to set up the registers This is the READ syscall (83) and it functions very much like scantin C. Coding Challenge #2 Using the READ syscall write an assembly language program (Lab3Challenge2.s) that takes a name as input and then prints out the message Hellename> Make sure that you fully comment your code. For this assignment you can assume that you will use no more than 12 letters in the name and reasonably handle using a name of less than 12 letters. For an added challenge you can allow variable input of the name and accommodate reasonably. This will involve concepts we will explore next week so it is good to at least identify what you would need to be able to do to accomplish this task When your code is complete, make sure you zip up all the files (Lab3Challengels, Lab3Challenge2.s, and templates and upload them to BrightSpace Read the entire lab instruction before starting This lab is to be completed on BrightSpace any lab worksheets handed in will be discarded. Carefully follow the procedures outlined in this lab worksheet. If at any time you are unsure or are having problems, consult your lab instructor Required Equipment: Raspberry Pi, GCC compiler, text editor. Part I: The Classic Hello World The classic first program that we usually try out simply displays the message hello world. This is a classic starting point for good reason. It is very simple code. Hello World verifies that we can compile or run code in our chosen language. And it establishes that we can produce some sort of output to the display device. The C code for hello world demonstrates this well. tinclude void main 04 printf ("Hello world! "); return; That is all: a preprocessor directive to include the printf function from the standard 1/0 library, our starting point which is a function called main, and a call to the printf function that is given our message string. I have added a return statement, just to cleanly exit the main function. However, there is a lot going on under the surface to allow us to write something so simple. NETHAL For this C code to compile it has to: Know where to find a function (printf()) that takes a string as an input and displays that string onto the screen. Know what a string is and how to work with that string. Know how to handle escaped characters in a string. Fortunately, the GCC compiler can readily handle all those details. And it can even allow us to call those C library functions from inside our assembly language code. (And we should note that it is quite common to include assembly language code inline in our programs when we need to deal with machine directly.) In class we will have compiled the following using the GCC compiler: lohal main are requires main as start For this code to compile it has to Know where to find a function (printf()) that takes a string as an input and displays that string onto the screen Know What a string is and how to work with that string. know how to handle escaped characters in a string, Fortunately, the GCC compiler can readily handle all those details. And it can even allow us to call those library functions from inside our assembly language code (And we should note that it is quite common to include assembly language code inline in our programs when we need to deal with machine directly.) In class we will have compiled the following using the GCC compiler. .global main gee requires a main as _start .extern printe a link c library print LOR :0,message RD - address of message BL print e call printf() subroutine exit: MOV 17,1 set EXIT syscall (+1) SWI 0 execute syscall .data message: soit " Hello world! Note that we used the label main instead of_start. This is because when we compile with GCC the compiler is expecting either code or an object file that is compiled code. Cuses main() as its starting function. Try compiling the code by replacing it with_start or linking it with Id and you will get an error. Try this In this code we encounter several assembler directives: Directive Description Use Makes a symbol available (visible) to the linker and therefore global visible to other partial programs you link your file with Otherwise symbols are local to that file. .global symbol This directive tells the linker that the symbol is a reference to extern something external to the code that invokes it .extern symbol This expects zero or more string literals separated by commas ascii and places cach string (unpadded with trailing zeros) into consecutive memory addresses .asciz "string", "string") We also encounter several opcodes (instructions that are helpful to unpack LDR (Load Register) Loads data from memory (usually RAM) into a register, in this case we use the modifier to load the address of a named string MOV (Move) Moves data from one register to another BL (Branch with Link) Uses the provided label to jump to a subroutine. Places the next instruction addres into the LR and then set the PC to the address of the first instruction of the labella subroutine. Later we can return by using the address in LR. SWI or SVC (Software Interrupt/Supervisor Call) Reads the value of R7 and executes the Operating System call (syscall) that is indicated. This instruction takes a numeric operand, but this is only used in certain debugging purposes. Note that every syscall must to be set up before you call it. Registers through 5 are often required to be set up for your syscall to function correctly. It is good practice to preserve your registers before setting up the syscal and then restoring them after the syscall is done One other thing to note about our code is that it uses an escaped character in the string literal ( ). This is a newline or lincfeed character. You can find these special characters in the ASCII table and they take up only one character. This wi be useful to understand for the next problem ASCII TABLE One other thing to note about our code is that it uses an escaped character in the string literal ( ). This is a new line or linefoed character. You can find these special characters in the ASCII table and they take up only one character. This will be useful to understand for the next problem ASCII TABLE 41 Coding Challenge #1 Now that you have seen hello world in both and using library functions. write your own hello world without using any library functions. You should use an Operating System call for writing your message to the screen. At the end of this lab you will upload your assembly code as LabChallengel.s (zipped with the other coding challenge code for this lab). You will also use this code to save as a template for writing all your code this semester. Save a copy as templates and make sure you add it to the zip file you submit for the lab. You will need the WRITE syscall (4) which takes three parameters starting at Roy a numeric constant flag that indicates where the output is sent the address of the string, and the number of characters to write Your code must be assembled and linked using the dynamic linker net GCC) When you have completed the code demonstrate at to your la structor Operating System call for writing your message to the screen. At the end of this lab you will upload your assembly code as Lab3Challengel. Czapped up with the other coding challenge code for this lab). You will also use this code to save as a template for writing all your code this semester, Save a copy as templates and make sure you add it to the zip file you submit for the lab You will need the WRITE syscall (4) which takes the parameters (starting at RO) a numeric constant flag that indicates where the output is sent, the address of the string, and the number of characters to write Your code must be assembled and linked using the dynamic linker (not GCC) When you have completed the code demonstrate it to your lab instructor Instructor Initiale: Date: Part 2: Working Memory Carefully read through the instructions it extch section before attempting the work If yow have any questions, please ask your lah instructor for assistance Make a copy of your code from the first coding challenge so that you can modify the code you wrote to explore further how it works You will not upload the code from this part of the lab, so you will not want to mess up the code you have already written (Take the opportunity to practice using Linur commands When you make a syscall the registers that you set are sometimes used. Try printing out the line a second time and see what happens if you do not re-set all the registers that govern the operation of the WRITE syscall. You can do this by copying your whole WRITE code and systematically commenting out each line of the copied code to see what changes occur. Registers are working memory, and this is what allows us to handle indirect memory access. We will need to understand traversing memory to make effective use of assembly language. It is one of the harder concepts that we will need to explore. At this stage you should note that we can put a value or an address into a register. When we put an address in the register it is a value that we can use to look up another value (where the address is pointing to). And that we can and will modify the contents of our registers. For example, if we want to examine each character in a string, we will set an address for the first byte and then increment that address pulling out the bytes to make our test. We will explore this more in coming lectures and labs When you have completed playing with your first code. You can move onto the last part of the lab which can be completed in class ee at home Part 3: Personalizing the Hello World Carefully read through the instructions in each section before attempting the work 1/ you have any questions, please ask your la destructor for assistance. You have seen two Linux syscalls so far, EXIT and WRITE I would like you to explore a third syscall and use the internet to determine how to set up the registers. This is the READ syscall (3) and it functions very much like scan() in C Make a copy of your code from the first coding challenge so that you can modify the code you wrote to explore further how it works. You will not upload the code from this part of the lab, so you will not want to mess up the code you have already written. (Take the opportunity to practice using Linux commands.) When you make a syscall the registers that you set are sometimes used. Try printing out the line a second time and see what happens if you do not re-set all the registers that govern the operation of the WRITE syscall. You can do this by copying your whole WRITE code and systematically commenting out each line of the copied code to see what changes occur. Registers are working memory, and this is what allows us to handle indirect SIP memory access. We will need to understand traversing memory to make effective use of assembly language. It is one of the harder concepts that we will need to explore. At this stage you should note that we can put a value or an address into a register. When we put an address in the register it is a value that we can use to look up another value (where the address is pointing to). And that we can and will modify the contents of our registers. For example, if we want to examine cach character in a string, we will set an address for the first byte and then increment that address pulling out the bytes to make our test. We will explore this more in coming lectures and labs. When you have completed playing with your first code. You can move onto the last part of the lab which can be completed in class or at home. Part 3: Personalizing the Hello World Carefully read through the instructions in each section before attempting the work If you have any questions, please ask your lab instructor for assistance. You have seen two Linux syscalls so far, EXIT and WRITE. I would like you to explore a third syscall and use the internet to determine how to set up the registers. This is the READ syscall (#3) and it functions very much like scanf() in C. Coding Challenge 2 Using the READ syscall write an assembly language program (Lab3Challenge2.s) that takes a name as input and then prints out the message: Hello Crame> Make sure that you fully comment your code. For this assignment you can assume that you will use no more than 12 letters in the name and reasonably handle using a name of less than 12 letters. For an added challenge you can allow variable input of the name and accommodate reasonably. This will involve concepts we will explore next week so it is good to at least identify what you would need to be able to do to accomplish this task When your code is complete, make sure you zip up all the files (Lab3Challengel.s. Lab3Challenge 2.s, and template.s) and upload them to BrightSpace. Read the entire lab instruction before starting This lab is to be completed on BrightSpace any lab worksheets handed in will be discarded. Carefully follow the procedures outlined in this lab worksheet. If at any time you are unsure or are having problems, consult your lab instructor. Required Equipment: Raspberry Pi, GCC compiler, text editor. Part I: The Classic Hello World The classic first program that we usually try out simply displays the message hello world. This is a classic starting point for good reason. It is very simple code. Hello World verifies that we can compile or run code in our chosen language. And it establishes that we can produce some sort of output to the display device. The C code for hello world demonstrates this well. #include void main 04 printf ("Hello World! "); return; That is all: a preprocessor directive to include the printf function from the standard I/O library, our starting point which is a function called main, and a call to the printf function that is given our message string. I have added a return statement, just to cleanly exit the main function. However, there is a lot going on under the surface to allow us to write something so simple. For this C code to compile it has to: Know where to find a function (printf()) that takes a string as an input and displays that string onto the screen. Know what a string is and how to work with that string. know how to handle escaped characters in a string, Fortunately, the GCC compiler can readily handle all those details. And it can even allow us to call those C library functions from inside our assembly language code. (And we should note that it is quite common to include assembly language code inline in our programs when we need to deal with machine directly.) In class we will have compiled the following using the GCC compiler: lhal main cereres maina start For this code to compile it has to: know where to find a function (printf()) that takes a string as an input and displays that string onto the screen. know what a string is and how to work with that string, know how to handle escaped characters in a string, Fortunately, the GCC compiler can readily handle all those detaik. And it can even allow us to call those library functions from inside our assembly language code (And we should note that it is quite common to include assembly language code inline in our programs when we need to deal with machine directly.) in class we will have compiled the following using the GCC compiler: global main e gee requires a main as_start extern print link library print) nain: LDR 10,-message @ RO - address of message BL print e call printe) sabroutine exit: MOV 17,1 set EXIT syscall (01) SWZ O execute syscall data message: ascit " Hello world! " Note that we used the label main instead of_start. This is because when we compile with GCC the compiler is expecting cither code or an object file that is compiled code. Cuses main() as its starting function. Try compiling the code by replacing it with _start or linking it with lid and you will get an error. Try this In this code we encounter several assembler directives Dirth Descriptions Makes a symbol available (visible) to the linker and therefore global visible to other partial programs you link your file with, Otherwise symbols are local to that file. global symbol This directive tells the linker that the symbol is a reference to extern something external to the code that invokes it. extern .ascti "string" i "string"-1 The same as schuld each come with a railine global .ascia "string". "string") We also encounter several opcodes (instructions that are helpful to unpack. LDR (Load Register) Loads data from memory (usually RAM) into a register, in this case we use the modifier to load the address of a named string MOV (Move) Moves data from one register to another. BL (Branch with Link) Uses the provided label to jump to a subroutine. Places the next instruction address into the LR and then set the PC to the address of the first instruction of the labelled subroutine. Later we can retum by using the address in LR. SWI or SVC (Software Interrupt/Supervisor Call) Reads the value of R7 and executes the Operating System call (ayscall) that is indicated. This instruction takes a numeric operand, but this is only used in certain debugging purposes. Note that every syscall must to be set up before you call it. Registers through 5 are often required to be set up for your syscall to function correctly. It is good practice to preserve your registers before setting up the syscall and then restoring them after the syscall is done One other thing to note about our code is that it uses an escaped character in the string literal(n). This is a newline or linefeed character. You can find these special characters in the ASCII table and they take up only one character. This will be useful to understand for the next problem ASCII TABLE One other thing to note about our code is that it uses an escaped character in the string literal (n). This is a newline or linefeed character. You can find these special characters in the ASCII table and they take up only one character. This will be useful to understand for the next problem. ASCII TABLE Coding Challenge #1 Now that you have seen hello world in both and using C library functions, write your own hello world without using any library functions. You should use an Operating System call for writing your message to the screen. At the end of this lab you will upload your assembly code as Lab3Challengel.s (zipped up with the other coding challenge code for this lab). You will also use this code to save as a template for writing all your code this semester. Save a copy as templates and make sure you add it to the zip file you submit for the lah You will need the WRITE syscall (4) which takes three parameters (starting at RO) a numeric constant flag that indicates where the output is sent, the address of the string, and the number of characters to write. Your code must be assembled and linked using the dynamic linker (net GCC) When you have completed the code demonstrate it to your lab instructor Operating System call for writing your message to the screen. At the end of this lab you will upload your assembly code as Lab3Challengels (zipped up with the other coding challenge code for this lab). You will also use this code to save as a template for writing all your code this semester. Save a copy as templates and make sure you add it to the zip file you submit for the lab You will need the WRITE syscall (4) which takes three parameters starting at RD a numeric constant flag that indicates where the output is sent the address of the string, and the number of characters to write Your code must be assembled and linked using the dynatric linker (not GCC) When you have completed the code demonstrate it to your lab instructor Instructor Initials Date: Part 2: Working Memory Carefully read through the instructions in each section before attempting the work If you have any questions, please ask peer lab instructor for assistance Make a copy of your code from the first coding challenge so that you can modify the code you wrote to explore further how it works. You will not upload the code from this part of the lab, so you will not want to mess up the code you have already written (Take the opportunity to practice using Limur commands When you make a syscall the registers that you set are sometimes used. Try printing out the line a second time and see what happens if you do not re-set all the registers that govern the operation of the WRITE syscall. You can do this by copying your whole WRITE code and systematically commenting out cach line of the copied code to see what changes occur Registers are working memory, and this is what allows us to handle indirect memory access. We will need to understand traversing memory to make effective use of assembly language. It is one of the harder concepts that we will need to explore. At this stage you should note that we can put a value of an address into a register. When we put an address in the register it is a value that we can use to look up another value (where the address is pointing to). And that we can and will modify the contents of our registers. For example, if we want to examine each character in a string, we will set an address for the first byte and then increment that address pulling out the bytes to make our test. We will explore this more in coming lectures and labs. When you have completed playing with your first code. You can move onto the last part of the lab which can be completed in class or at home. Part 3: Personalizing the Hello World Carefully read through the instructions in each section before attempting the work If you have any questions, please ask your las instructor for assistance You have seen two Linux syscalls so far, EXIT and WRITE. I would like y you to explore a third syscall and use the internet to determine how to set up the registers This is the READ syscall (13) and it functions very much like scanf() in C Make a copy of your code from the first coding challenge so that you can modify the code you wrote to explore further how it works. You will not upload the code from this part of the lab, so you will not want to mess up the code you have already written. (Take the opportunity to practice using Linux commands) When you make a syscall the registers that you set are sometimes used. Try printing out the line a second time and see what happens if you do not re-set all the registers that govern the operation of the WRITE syscall. You can do this by copying your whole WRITE code and systematically commenting out each line of the copied code to see what changes occur. Registers are working memory, and this is what allows us to handle instirect SIP memory access. We will need to understand traversing memory to make effective use of assembly language. It is one of the harder concepts that we will need to explore. At this stage you should note that we can put a value of an address into a register. When we put an address in the register it is a value that we can use to look up another value (where the address is pointing to). And that we can and will modify the contents of our registers. For example, if we want to examine cach character in a string. We will not an address for the first byte and then increment that address pulling out the bytes to make our test. We will explore this mate in coming lectures and labs When you have completed playing with your first code. You can move onto the last part of the lab which can be completed in class or at home Part 3: Personalizing the Hello World Carefully read through the instructions in each section before artempting the work If you have any questions, please ask your lab instructor for assistance You have seen two Linux syscalls so far, EXIT and WRITE. I would like you to explore a third syscall and use the internet to determine how to set up the registers This is the READ syscall (83) and it functions very much like scantin C. Coding Challenge #2 Using the READ syscall write an assembly language program (Lab3Challenge2.s) that takes a name as input and then prints out the message Hellename> Make sure that you fully comment your code. For this assignment you can assume that you will use no more than 12 letters in the name and reasonably handle using a name of less than 12 letters. For an added challenge you can allow variable input of the name and accommodate reasonably. This will involve concepts we will explore next week so it is good to at least identify what you would need to be able to do to accomplish this task When your code is complete, make sure you zip up all the files (Lab3Challengels, Lab3Challenge2.s, and templates and upload them to BrightSpace Read the entire lab instruction before starting This lab is to be completed on BrightSpace any lab worksheets handed in will be discarded. Carefully follow the procedures outlined in this lab worksheet. If at any time you are unsure or are having problems, consult your lab instructor Required Equipment: Raspberry Pi, GCC compiler, text editor. Part I: The Classic Hello World The classic first program that we usually try out simply displays the message hello world. This is a classic starting point for good reason. It is very simple code. Hello World verifies that we can compile or run code in our chosen language. And it establishes that we can produce some sort of output to the display device. The C code for hello world demonstrates this well. tinclude void main 04 printf ("Hello world! "); return; That is all: a preprocessor directive to include the printf function from the standard 1/0 library, our starting point which is a function called main, and a call to the printf function that is given our message string. I have added a return statement, just to cleanly exit the main function. However, there is a lot going on under the surface to allow us to write something so simple. NETHAL For this C code to compile it has to: Know where to find a function (printf()) that takes a string as an input and displays that string onto the screen. Know what a string is and how to work with that string. Know how to handle escaped characters in a string. Fortunately, the GCC compiler can readily handle all those details. And it can even allow us to call those C library functions from inside our assembly language code. (And we should note that it is quite common to include assembly language code inline in our programs when we need to deal with machine directly.) In class we will have compiled the following using the GCC compiler: lohal main are requires main as start For this code to compile it has to Know where to find a function (printf()) that takes a string as an input and displays that string onto the screen Know What a string is and how to work with that string. know how to handle escaped characters in a string, Fortunately, the GCC compiler can readily handle all those details. And it can even allow us to call those library functions from inside our assembly language code (And we should note that it is quite common to include assembly language code inline in our programs when we need to deal with machine directly.) In class we will have compiled the following using the GCC compiler. .global main gee requires a main as _start .extern printe a link c library print LOR :0,message RD - address of message BL print e call printf() subroutine exit: MOV 17,1 set EXIT syscall (+1) SWI 0 execute syscall .data message: soit " Hello world! Note that we used the label main instead of_start. This is because when we compile with GCC the compiler is expecting either code or an object file that is compiled code. Cuses main() as its starting function. Try compiling the code by replacing it with_start or linking it with Id and you will get an error. Try this In this code we encounter several assembler directives: Directive Description Use Makes a symbol available (visible) to the linker and therefore global visible to other partial programs you link your file with Otherwise symbols are local to that file. .global symbol This directive tells the linker that the symbol is a reference to extern something external to the code that invokes it .extern symbol This expects zero or more string literals separated by commas ascii and places cach string (unpadded with trailing zeros) into consecutive memory addresses .asciz "string", "string") We also encounter several opcodes (instructions that are helpful to unpack LDR (Load Register) Loads data from memory (usually RAM) into a register, in this case we use the modifier to load the address of a named string MOV (Move) Moves data from one register to another BL (Branch with Link) Uses the provided label to jump to a subroutine. Places the next instruction addres into the LR and then set the PC to the address of the first instruction of the labella subroutine. Later we can return by using the address in LR. SWI or SVC (Software Interrupt/Supervisor Call) Reads the value of R7 and executes the Operating System call (syscall) that is indicated. This instruction takes a numeric operand, but this is only used in certain debugging purposes. Note that every syscall must to be set up before you call it. Registers through 5 are often required to be set up for your syscall to function correctly. It is good practice to preserve your registers before setting up the syscal and then restoring them after the syscall is done One other thing to note about our code is that it uses an escaped character in the string literal ( ). This is a newline or lincfeed character. You can find these special characters in the ASCII table and they take up only one character. This wi be useful to understand for the next problem ASCII TABLE One other thing to note about our code is that it uses an escaped character in the string literal ( ). This is a new line or linefoed character. You can find these special characters in the ASCII table and they take up only one character. This will be useful to understand for the next problem ASCII TABLE 41 Coding Challenge #1 Now that you have seen hello world in both and using library functions. write your own hello world without using any library functions. You should use an Operating System call for writing your message to the screen. At the end of this lab you will upload your assembly code as LabChallengel.s (zipped with the other coding challenge code for this lab). You will also use this code to save as a template for writing all your code this semester. Save a copy as templates and make sure you add it to the zip file you submit for the lab. You will need the WRITE syscall (4) which takes three parameters starting at Roy a numeric constant flag that indicates where the output is sent the address of the string, and the number of characters to write Your code must be assembled and linked using the dynamic linker net GCC) When you have completed the code demonstrate at to your la structor Operating System call for writing your message to the screen. At the end of this lab you will upload your assembly code as Lab3Challengel. Czapped up with the other coding challenge code for this lab). You will also use this code to save as a template for writing all your code this semester, Save a copy as templates and make sure you add it to the zip file you submit for the lab You will need the WRITE syscall (4) which takes the parameters (starting at RO) a numeric constant flag that indicates where the output is sent, the address of the string, and the number of characters to write Your code must be assembled and linked using the dynamic linker (not GCC) When you have completed the code demonstrate it to your lab instructor Instructor Initiale: Date: Part 2: Working Memory Carefully read through the instructions it extch section before attempting the work If yow have any questions, please ask your lah instructor for assistance Make a copy of your code from the first coding challenge so that you can modify the code you wrote to explore further how it works You will not upload the code from this part of the lab, so you will not want to mess up the code you have already written (Take the opportunity to practice using Linur commands When you make a syscall the registers that you set are sometimes used. Try printing out the line a second time and see what happens if you do not re-set all the registers that govern the operation of the WRITE syscall. You can do this by copying your whole WRITE code and systematically commenting out each line of the copied code to see what changes occur. Registers are working memory, and this is what allows us to handle indirect memory access. We will need to understand traversing memory to make effective use of assembly language. It is one of the harder concepts that we will need to explore. At this stage you should note that we can put a value or an address into a register. When we put an address in the register it is a value that we can use to look up another value (where the address is pointing to). And that we can and will modify the contents of our registers. For example, if we want to examine each character in a string, we will set an address for the first byte and then increment that address pulling out the bytes to make our test. We will explore this more in coming lectures and labs When you have completed playing with your first code. You can move onto the last part of the lab which can be completed in class ee at home Part 3: Personalizing the Hello World Carefully read through the instructions in each section before attempting the work 1/ you have any questions, please ask your la destructor for assistance. You have seen two Linux syscalls so far, EXIT and WRITE I would like you to explore a third syscall and use the internet to determine how to set up the registers. This is the READ syscall (3) and it functions very much like scan() in C Make a copy of your code from the first coding challenge so that you can modify the code you wrote to explore further how it works. You will not upload the code from this part of the lab, so you will not want to mess up the code you have already written. (Take the opportunity to practice using Linux commands.) When you make a syscall the registers that you set are sometimes used. Try printing out the line a second time and see what happens if you do not re-set all the registers that govern the operation of the WRITE syscall. You can do this by copying your whole WRITE code and systematically commenting out each line of the copied code to see what changes occur. Registers are working memory, and this is what allows us to handle indirect SIP memory access. We will need to understand traversing memory to make effective use of assembly language. It is one of the harder concepts that we will need to explore. At this stage you should note that we can put a value or an address into a register. When we put an address in the register it is a value that we can use to look up another value (where the address is pointing to). And that we can and will modify the contents of our registers. For example, if we want to examine cach character in a string, we will set an address for the first byte and then increment that address pulling out the bytes to make our test. We will explore this more in coming lectures and labs. When you have completed playing with your first code. You can move onto the last part of the lab which can be completed in class or at home. Part 3: Personalizing the Hello World Carefully read through the instructions in each section before attempting the work If you have any questions, please ask your lab instructor for assistance. You have seen two Linux syscalls so far, EXIT and WRITE. I would like you to explore a third syscall and use the internet to determine how to set up the registers. This is the READ syscall (#3) and it functions very much like scanf() in C. Coding Challenge 2 Using the READ syscall write an assembly language program (Lab3Challenge2.s) that takes a name as input and then prints out the message: Hello Crame> Make sure that you fully comment your code. For this assignment you can assume that you will use no more than 12 letters in the name and reasonably handle using a name of less than 12 letters. For an added challenge you can allow variable input of the name and accommodate reasonably. This will involve concepts we will explore next week so it is good to at least identify what you would need to be able to do to accomplish this task When your code is complete, make sure you zip up all the files (Lab3Challengel.s. Lab3Challenge 2.s, and template.s) and upload them to BrightSpace