Question: The quistions in red color Chapter 02. Exercise 02-01 Page 1 of 20 GBI SE Chapter 02: Introduction to SAP Exercise 02-01: SAP Navigation Multiple
 The quistions in red color
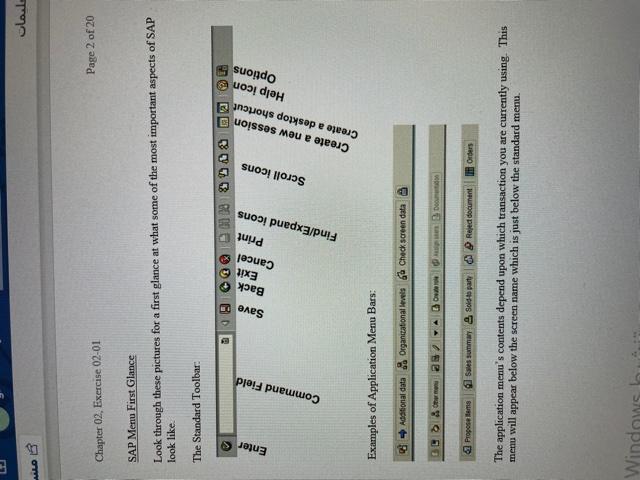
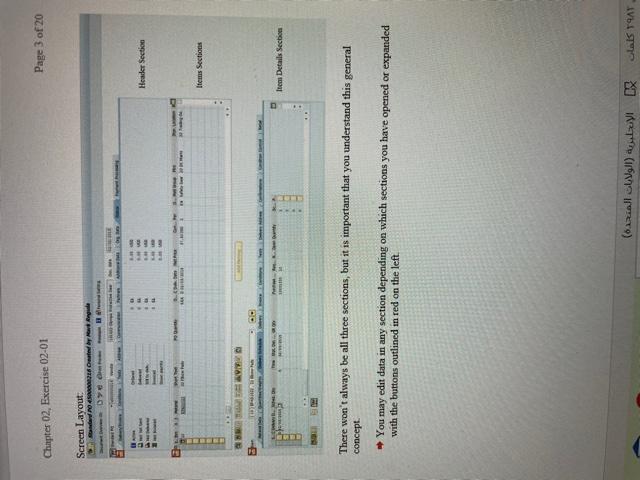
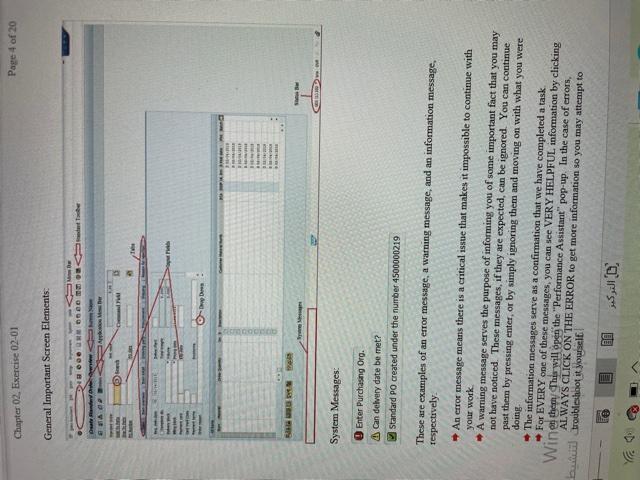
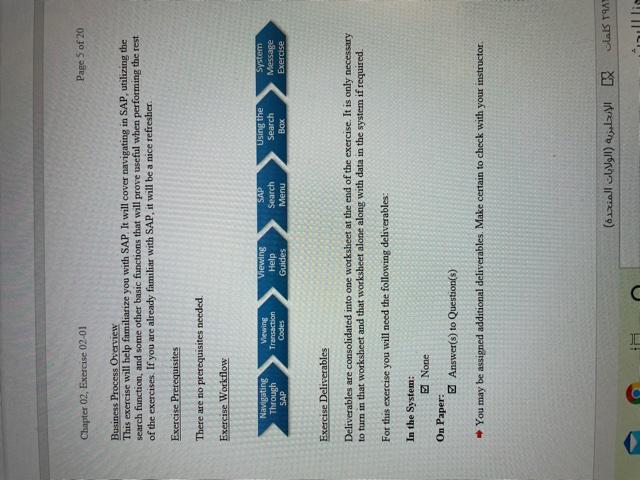
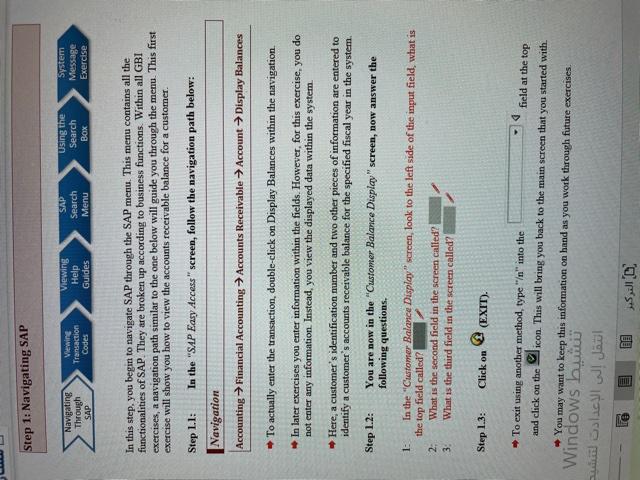
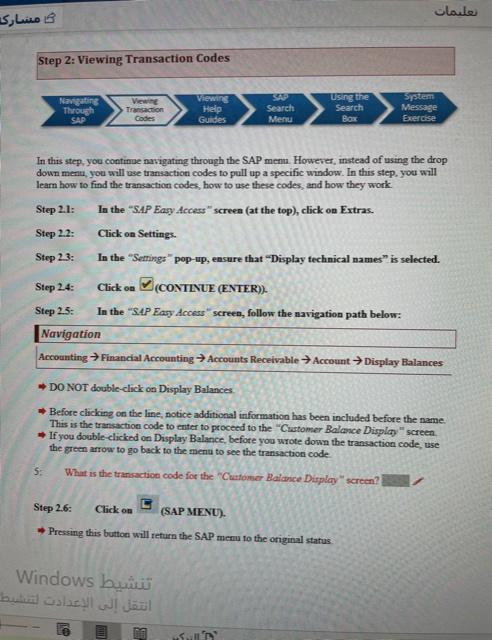
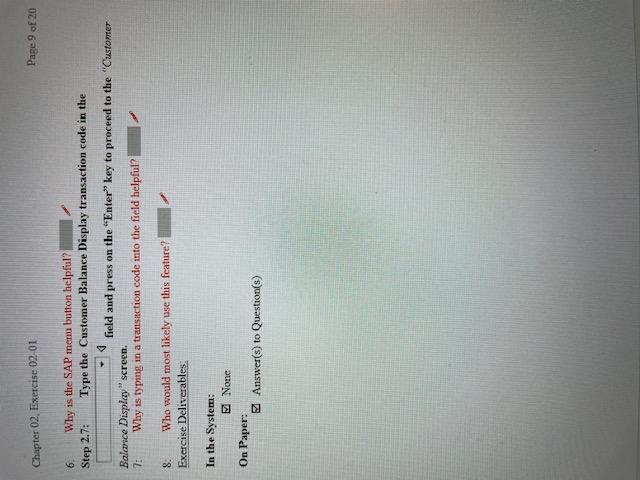
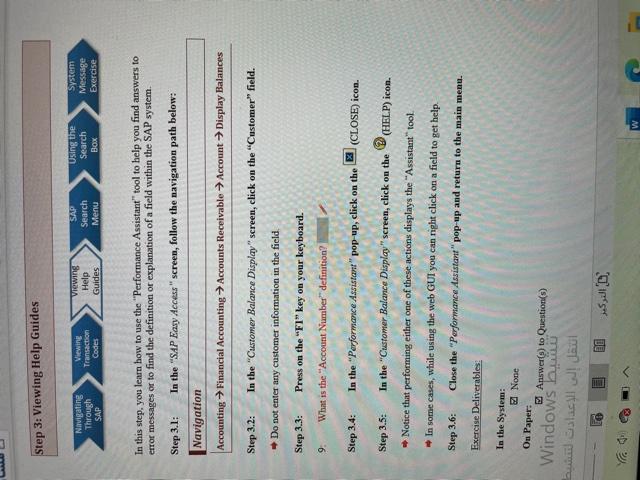
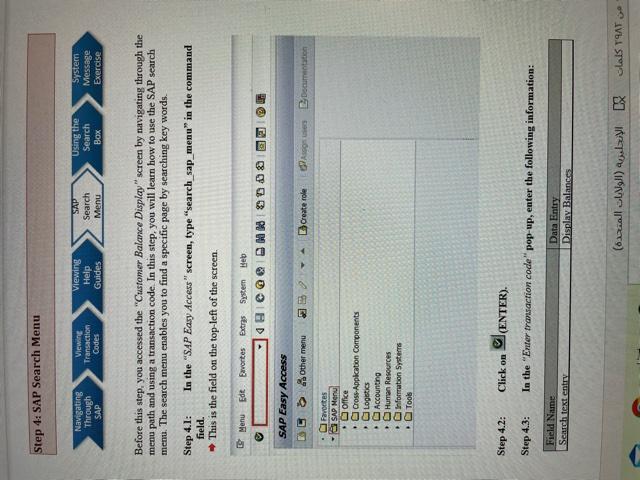
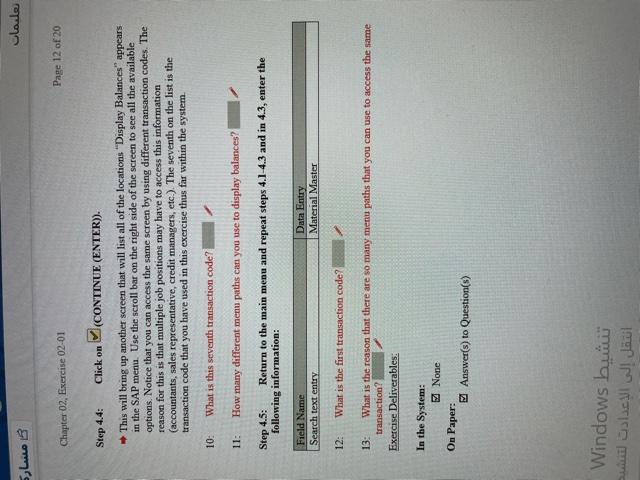
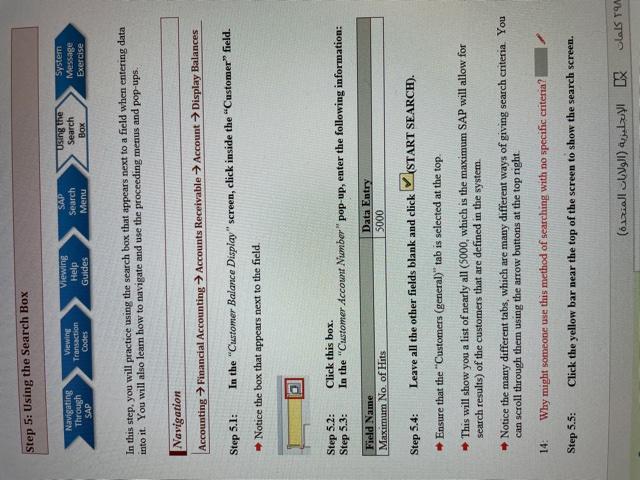
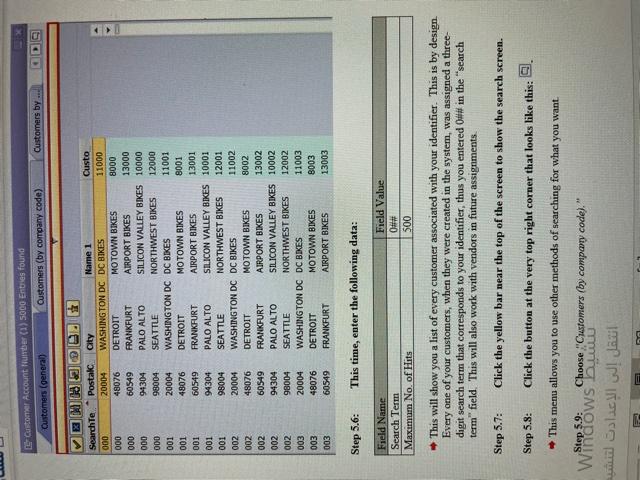
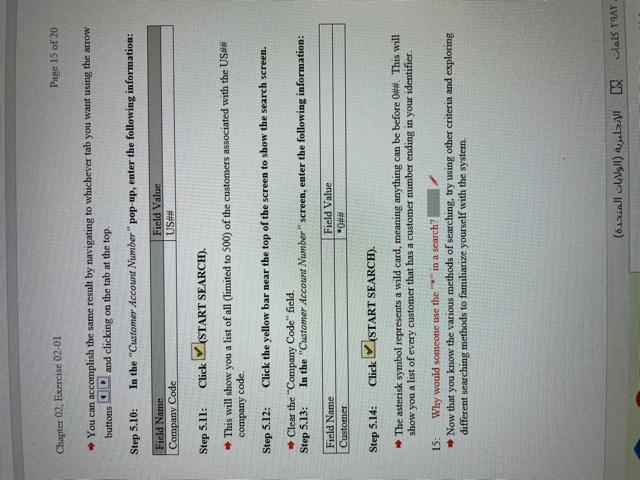
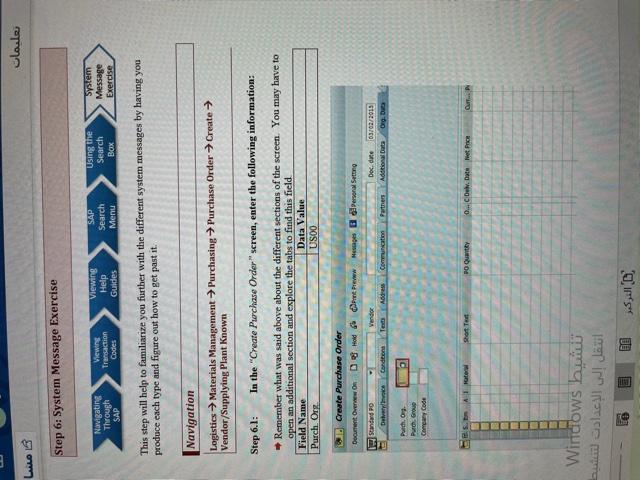
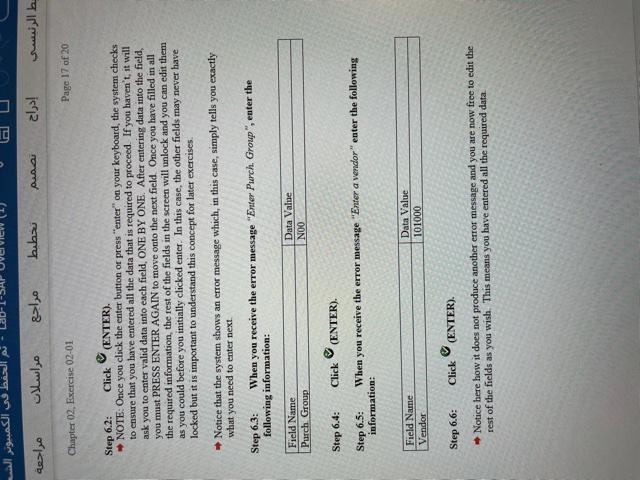
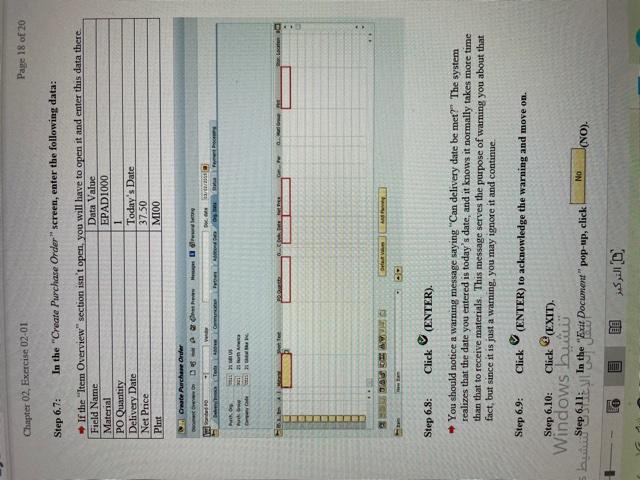
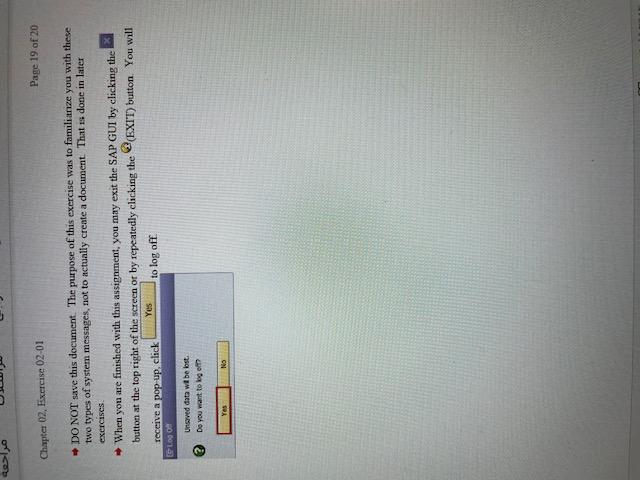
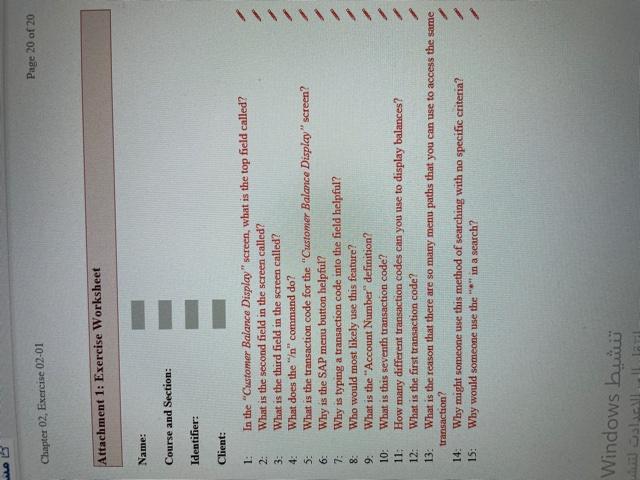
Chapter 02. Exercise 02-01 Page 1 of 20 GBI SE Chapter 02: Introduction to SAP Exercise 02-01: SAP Navigation Multiple Company Code Version 4.14 Revised 7/27/2015 Global Bicycles Incorporated Introduction General Notes and Information It is strongly recommended that you read through the entire exercise prior to starting. Not all instructions can be provided in a linear manner in the exercise itself. READ CAREFULLY! The following symbols are used to indicate important information as described below. An arrow highlights an important instruction that must not be overlooked A pencil prompts you to write down an important piece of information Each student or group will be assigned a unique three digit identifier. This identifier is used in all exercises to uniquely identify your data. Whenever you see three-digit in these exercises, replace it with your identifier Differences in Font: Throughout this exercise you will see tables with different fonts used in the Data Entry column(s). The normal Times New Roman indicates you enter exactly what is typed out except for the ## Symbol where you would put in your identifier. The italicized Times New Roman font indicates the data is looked up, found, or otherwise not to be entered literally as written Always work with your data When you Log onto SAP for the first time you may get a pop-op message regarding copyright information, please accept the terms to continue into SAP. From the SAP Logon screen, make sure that you DO NOT click on the Logn (LOG ON) button in the upper left hand corner of the screen. Instead, double-click on the assigned system name. ES Tu Gloul MLO Chapter 02. Exercise 02-01 Page 2 of 20 SAP Menu First Glance Look through these pictures for a first glance at what some of the most important aspects of SAP look like. The Standard Toolbar: a 99 CO 0008 S @ Enter Examples of Application Menu Bars: Additional data Organizational levels 6 Check screen data IL & Chas DOM Door Ses summa e sold to party Rejed document Orders The application menu's contents depend upon which transaction you are currently using. This menu will appear below the screen name which is just below the standard menu. Windows Chapter 02, Exercise 02-01 Page 3 of 20 Screen Layout SARON O Ringe ye . Header Section Items Sections AVIS Tren Details Section There won't always be all three sections, but it is important that you understand this general concept You may edit data in any section depending on which sections you have opened or expanded with the buttons outlined in red on the left. ( ) TOAT Chapter 02. Exercise 02-01 Page 4 of 20 General Important Screen Elements Queen Ort Arpe ODD SUN COM System Messages: Enter Purchasing Org. Can delvery date be met? Standard PO created under the number 4500000219 These are examples of an error message, a warning message, and an information message, respectively An error message means there is a critical issue that makes it impossible to continue with your work A warning message serves the purpose of informing you of some important fact that you may not have noticed. These messages, if they are expected, can be ignored. You can continue past them by pressing enter, or by simply ignoring them and moving on with what you were dom The information messages serve as a confirmation that we have completed a task. For EVERY one of these messages, you can see VERY HELPFUL information by clicking Wine then, This will open the "Performance Assistant" pop-up. In the case of errors, ALWAYS CLICK ON THE ERROR to get more information so you may attempt to bu troubleshoot it yourself Chapter 02. Exercise 02-01 Page 5 of 20 Business Process Overview This exercise will help familiarize you with SAP. It will cover navigating in SAP, utilizing the search function, and some other basic functions that will prove useful when performing the rest of the exercises. If you are already familiar with SAP, it will be a nice refresher. Exercise Prerequisites There are no prerequisites needed Exercise Workflow Navigating Through SAP Viewing Transaction Codes Viewing Help Guides SAP Search Menu Using the Search System Message Exercise Box Exercise Deliverables Deliverables are consolidated into one worksheet at the end of the exercise. It is only necessary to turn in that worksheet and that worksheet alone along with data in the system if required. For this exercise you will need the following deliverables: In the System: None On Paper: Answer(s) to Question(s) You may be assigned additional deliverables. Make certain to check with your instructor ] ( ) TA C Step 1: Navigating SAP Navigating Through SAP Viewing Transaction Codes Viewing Help Guides SAP Search Menu Using the Search BOX System Message Exercise In this step, you begin to navigate SAP through the SAP menu. This menu contains all the functionalities of SAP. They are broken up according to business functions. Within all GBI exercises, a navigation path similar to the one below will guide you through the menu. This first exercise will show you how to view the accounts receivable balance for a customer. Step 1.1: In the "SAP Easy Access" screen, follow the navigation path below: Navigation Accounting Financial Accounting Accounts Receivable Account Display Balances To actually enter the transaction, double-click on Display Balances within the navigation In later exercises you enter information within the fields. However, for this exercise, you do not enter any information. Instead, you view the displayed data within the system Here, a customer's identification number and two other pieces of information are entered to identify a customer's accounts receivable balance for the specified fiscal year in the system. Step 1.2: You are now in the "Customer Balance Display screen, now answer the following questions. 1: 2: 3: In the "Customer Balance Display screen, look to the left side of the input field, what is the top field called? What is the second field in the screen called? What is the third field in the screen called? Step 1.3: Click on (EXIT). To exit using another method, type "" into the field at the top and click on the icon. This will bring you back to the main screen that you started with You may want to keep this information on hand as you work through future exercises. Windows Chapter 02, Exercise 02-01 Page 7 of 20 4: What does the "in" command do? Exercise Deliverables In the System: None On Paper: Answer(s) to Question(s) shals Step 2: Viewing Transaction Codes Navigating Through SAP Viewing Transaction Codes Viewing Help Guides Search Menu Using the Search BOX System Message Exercise In this step, you continue navigating through the SAP mem However, instead of using the drop down menu, you will use transaction codes to pull up a specific window. In this step, you will learn how to find the transaction codes, how to use these codes, and how they work Step 2.1: In the "SAP Easy Access screen (at the top), click on Extras. Step 2.2: Click on Settings Step 2.3: In the "Settings" pop-up, ensure that "Display technical names" is selected. Step 24: Click on (CONTINUE (ENTER) Step 2.3: In the "SAP Easy Access screen, follow the navigation path below: Navigation Accounting Financial Accounting Accounts Receivable Account Display Balances DO NOT double-click on Display Balances Before clicking on the line, notice additional information has been included before the name This is the transaction code to enter to proceed to the Customer Balance Display screen If you double-click on Display Balance, before you wrote down the transaction code, use the green arrow to go back to the menu to see the transaction code 5: What is the transaction code for the "Customer Balance Display screen? Step 2.6: Click on C (SAP MENU). Pressing this button will return the SAP mem to the original status Windows Chapter 02, Exercise 02-01 Page 9 of 20 6 Why is the SAP menu button helpful? Step 2.7: Type the Customer Balance Display transaction code in the field and press on the "Enter" key to proceed to the "Customer Balance Display screen. 7: Why is typing in a transaction code into the field helpful? 8. Who would most likely use this feature? Exercise Deliverables In the System: None On Paper: Answer(s) to Question(s) Step 3: Viewing Help Guides Navigating Through SAP Viewing Transaction Codes Viewing Help Guides SAP Search Menu Using the Search Box System Message Exercise In this step. you learn how to use the "Performance Assistant tool to help you find answers to error messages or to find the definition or explanation of a field within the SAP system. Step 3.1: In the "SAP Easy Access" screen, follow the navigation path below: Navigation Accounting Financial Accounting Accounts Receivable Account Display Balances Step 3.2: In the "Customer Balance Display" screen, click on the "Customer" field. Do not enter any customer information in the field. Step 3.3: Press on the "F1"key on your keyboard. 9. What is the "Account Number" definition? Step 3.4: In the "Performance Assistant pop up, click on the X (CLOSE) icon. Step 3.5: In the "Customer Balance Display" screen, click on the (HELP) icon. Notice that performing either one of these actions displays the "Assistant tool In some cases, while using the web GUI you can right click on a field to get help Step 3.6: Close the "Performance Assistant pop-up and return to the main menu Exercise Deliverables In the System: 2 None On Paper: Answer(s) to Question(s) Windows bm ! W Step 4: SAP Search Menu Navigating Through SAP Viewing Transaction Codes Viewing Help Guides SAP Search Menu Using the Search Box System Message Exercise Before this step, you accessed the "Customer Balance Display" screen by navigating through the menu path and using a transaction code. In this step, you will learn how to use the SAP search menu. The search menu enables you to find a specific page by searching key words Step 4.1: In the "SAP Easy Access" screen, type "search_sap_menu" in the command field. This is the field on the top-left of the screen. Menu Ede Evorites Extras System Web Ge@@ DNS SAP Easy Access Other menu 23 Create role PASSO Documentation Favorites SAP Menu Office Cross-Appkcation Components Logetics Accounting Human Resources Information Systems Tools Step 4.2: Click on (ENTER). Step 4.3: In the "Enter transaction code" pop-up, enter the following information: Field Name Search text entry Data Entry Display Balances L ( ) Chapter 02, Exercise 02-01 Page 12 of 20 Step 4.4: M(CONTINUE (ENTER)). Click on This will bring up another screen that will list all of the locations "Display Balances" appears in the SAP menu. Use the scroll bar on the right side of the screen to see all the available options. Notice that you can access the same screen by using different transaction codes. The reason for this is that multiple job positions may have to access this information (accountants, sales representative, credit managers, etc.). The seventh on the list is the transaction code that you have used in this exercise thus far within the system 10: What is this seventh transaction code? 11: How many different menu paths can you use to display balances? Step 4.5: Return to the main menu and repeat steps 4.1-4.3 and in 4.3, enter the following information: Field Name Search text entry Data Entry Material Master 12: What is the first transaction code? 13: What is the reason that there are so many menu paths that you can use to access the same transaction? Exercise Deliverables: In the System: 2 None On Paper: Answer(s) to Question(s) Windows Step 5: Using the Search Box Navigating Through SAP Viewing Transaction Codes Viewing Help Guides Search Menu Using the Search Box System Message Exercise In this step, you will practice using the search box that appears next to a field when entering data into it. You will also learn how to navigate and use the proceeding menus and pop-ups. Navigation Accounting Financial Accounting Accounts Receivable Account Display Balances Step 5.1: In the "Customer Balance Display" screen, click inside the "Customer" field. Notice the box that appears next to the field. A Step 5.2: Step 5.3: Click this box. In the "Customer Account Number" pop-up, enter the following information: Field Name Maximum No. of Hits Data Entry 5000 Step 5.4: Leave all the other fields blank and click START SEARCH). Ensure that the "Customers (general)" tab is selected at the top. This will show you a list of nearly all (5000, which is the maximum SAP will allow for search results) of the customers that are defined in the system. Notice the many different tabs, which are many different ways of giving search criteria. You can scroll through them using the arrow buttons at the top right 14: Why might someone use this method of searching with no specific criteria? Step 5.5: Click the yellow bar near the top of the screen to show the search screen. ( ) LX T4 Lastomer Account Number (1) 5000 Entries found Customers (general Customers (by company code) Customers by SearchTe 000 000 000 000 000 001 001 001 001 001 002 002 Postal 20004 48076 60549 94304 98004 20004 48076 60549 94304 98004 20004 48076 60549 94304 98004 20004 48076 60549 City Name 1 Custo WASHINGTON DC DC BIKES 11000 DETROIT MOTOWN BIKES 8000 FRANKFURT AIRPORT BIKES 13000 PALO ALTO SILICON VALLEY BIKES 10000 SEATTLE NORTHWEST BIKES 12000 WASHINGTON DC DC BIKES 11001 DETROIT MOTOWN BIKES 8001 FRANKFURT AIRPORT BIKES 13001 PALO ALTO SILICON VALLEY BIKES 10001 SEATTLE NORTHWEST BIKES 12001 WASHINGTON DC DC BIKES 11002 DETROIT MOTOWN BIKES 8002 FRANKFURT AIRPORT BIKES 13002 PALO ALTO SILICON VALLEY BIKES 10002 SEATTLE NORTHWEST BIKES 12002 WASHINGTON DC DC BIKES 11003 DETROIT MOTOWN BIKES B003 FRANKFURT AIRPORT BIKES 13003 002 002 002 003 003 003 Step 5.6: This time, enter the following data: Field Name Search Term Maximum No. of Hits Field Value 0## 500 This will show you a list of every customer associated with your identifier. This is by design Every one of your customers, when they were created in the system, was assigned a three- digit search term that corresponds to your identifier, thus you entered Off# in the search term" field. This will also work with vendors in future assignments Step 5.7: Click the yellow bar near the top of the screen to show the search screen. Step 5.8: Click the button at the very top right corner that looks like this: This menu allows you to use other methods of searching for what you want. Step 5.9: Choose "Castomers (by company code). Windows DULU w Chapter 02, Exercise 02-01 Page 15 of 20 You can accomplish the same result by navigating to whichever tab you want using the arrow buttons D and clicking on the tab at the top Step 5.10: In the "Customer Account Number" pop-up, enter the following information: Field Name Company Code Field Value US## Step 5.11: Click (START SEARCH). company code. This will show you a list of all (limited to 500) of the customers associated with the US## Step 5.12: Click the yellow bar near the top of the screen to show the search screen. Clear the "Company Code field. Step 5.13: In the "Customer Account Number" screen, enter the following information: Field Name Customer Field Value "O## Step 5.14: Click (START SEARCH). The asterisk symbol represents a wild card, meaning anything can be before O## This will show you a list of every customer that has a customer number ending in your identifier. 15: Why would someone use the "in a search? Now that you know the various methods of searching, try using other criteria and exploring different searching methods to familiarize yourself with the system. ( ) Step 6: System Message Exercise Navigating Through SAP Views Transaction Codes Viewing Help Guides Search Menu Using the Search System Message Exercise This step will help to familiarize you further with the different system messages by having you produce each type and figure out how to get past it Navigation Logistics Materials Management Purchasing Vendor/Supplying Plant Known Purchase Order Create Step 6.1: In the "Create Purchase Order" screen, enter the following information: Remember what was said above about the different sections of the screen. You may have to open an additional section and explore the tabs to find this field Field Name Data Value Purch Org. USOO Create Purchase Order Document Over On D 3 Holdmt Prew He personal Setting Standard PO Vendor Doc. die 03/02/2015 Data Ted Adress Communication thes Additional Data Org. POGONO Camery Code Est Auto Short Te 20 t 0... Del. Dat et Price Qur... Windows ! IS B Chapter 02, Exercise 02-01 Page 17 of 20 Step 6.2: Click (ENTER). NOTE: Once you click the enter button or press "enter" on your keyboard, the system checks to ensure that you have entered all the data that is required to proceed. If you haven't, it will ask you to enter valid data into each field, ONE BY ONE. After entering data into the field, you must PRESS ENTER AGAIN to move onto the next field Once you have filled in all the required information, the rest of the fields in the screen will unlock and you can edit them as you could before you initially clicked enter. In this case, the other fields may never have locked but it is important to understand this concept for later exercises. Notice that the system shows an error message which, in this case, simply tells you exactly what you need to enter next Step 6.3: When you receive the error message "Enter Purch Group", enter the following information: Field Name Purch Group Data Value NOO Step 6.4: Click (ENTER). Step 6.5: When you receive the error message "Enter a vendor" enter the following information: Field Name Vendor Data Value 101000 Step 6.6: Click (ENTER). Notice here how it does not produce another error message and you are now free to edit the rest of the fields as you wish. This means you have entered all the required data. Chapter 02, Exercise 02-01 Page 18 of 20 Step 6.7: In the "Create Purchase Order" screen, enter the following data: If the "Item Overview" section isn't open, you will have to open it and enter this data there Field Name Data Value Material EPAD1000 PO Quantity 1 Delivery Date Today's Date Net Price 37.50 Pint MIOO One Purchase Order Other Do IN Ort Step 6.8: Click (ENTER). You should notice a warning message saying "Can delivery date be met? The system realizes that the date you entered is today's date, and it knows it normally takes more time than that to receive materials. This message serves the purpose of warning you about that fact, but since it is just a warning, you may ignore it and continue. Step 6.9: Click (ENTER) to acknowledge the warning and move on. Click @EXIT). Step 6.10: No 1: ta " In the "Edit Document" pop-up, click (NO). Chapter 02, Exercise 02-01 Page 19 of 20 - DO NOT save this document. The purpose of this exercise was to familianze you with these two types of system messages, not to actually create a document. That is done in later exercises When yon are finished with this assignment, you may exit the SAP GUI by clicking the button at the top right of the screen or by repeatedly clicking the EXIT) button. You will Yes receive a pop up, click to log off LOGO Unaved data will be bst. Do you want to go? Yes No Page 20 of 20 Chapter 02, Exercise 02-01 Attachment 1: Exercise Worksheet Name: Course and Section: Identifier: Client: 1: In the "Customer Balance Display" screen, what is the top field called? 2: What is the second field in the screen called? 3: What is the third field in the screen called? 4: What does the "In" command do? 5: What is the transaction code for the "Customer Balance Display" screen? 6: Why is the SAP menu button helpful? 7: Why is typing a transaction code into the field helpful? 8: Who would most likely use this feature? 9: What is the "Account Number" definition? 10: What is this seventh transaction code? 11; How many different transaction codes can you use to display balances? 12: What is the first transaction code? 13: What is the reason that there are so many menu paths that you can use to access the same transaction? 14: Why might someone use this method of searching with no specific criteria? Why would someone use the in a search? 15: Windows


