

Joanna Lund, the director of the Ambleside Community Center in Bangor, Maine, needs to develop a presentation
Question:
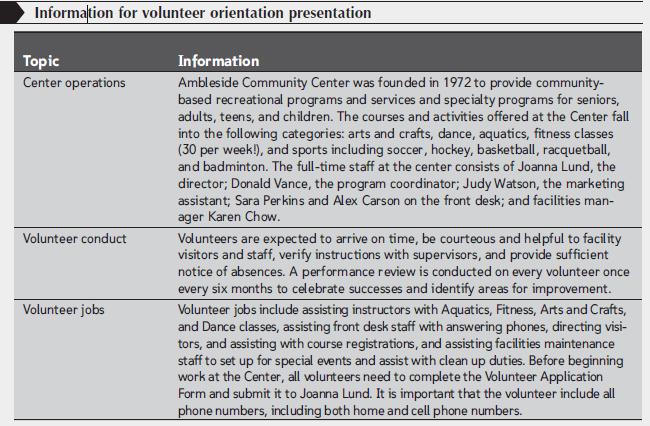
Joanna Lund, the director of the Ambleside Community Center in Bangor, Maine, needs to develop a presentation that she can deliver to volunteers interested in helping out at the Center. The volunteers need to understand something about the operations of the Center, how they should conduct themselves at the center, and what kinds of volunteer jobs are available.
Figure 14-13 includes the information that Joanna wants to present. Follow the steps below as you work in PowerPoint and in Word to organize this information into slide titles and bulleted items.
1. Create a new blank presentation in PowerPoint, click the Outline tab, enter Volunteer Orientation as the presentation title on slide 1 followed by Ambleside Community Center and your name on two separate lines in the subtitle, and then save the file as Volunteer Orientation in the Project.14 folder.
2. On slide 2 in Outline view, enter Overview as the slide title, and then enter the three topics for the presentation: Center Overview, Volunteer Conduct, and Volunteer Jobs.
3. In Word, open the file Practice_14.docx located in the Project.14 folder included with your Data Files, and then to avoid altering the original file, save the document as Volunteer Orientation Outline in the same folder.
4. Switch to Outline view in Word.
5. Refer to the information provided in Figure 14-13 and then replace the placeholder text with appropriate slide titles and bulleted items. Remember that slide titles are Level 1 headings in Word and bulleted items are Level 2 and 3 headings in Word.
You determine how to divide the information into slides and how to condense the information into bulleted points. Assign two to three slides to each of the three main topics.
6. You should aim to create a presentation consisting of about 12 slides, including the title slide, overview slides, and a summary slide containing contact information. You can refer to volunteers directly as you in the presentation. For example, instead of writing Volunteers are expected to arrive on time., you could write Please arrive on time.
7. Save and close the Word file, and then in PowerPoint, import the Word outline into the active presentation. Be sure to copy slide 2, the Overview slide, so it appears before each main topic. Also, be sure to bold the bullet for the main topic being discussed in the next set of slides.
8. In PowerPoint, apply the presentation theme of your choice, select a new color scheme, and then change the background style to the textured or gradient fill style of your choice. Remember to select a subtle style that will not overwhelm the text.
9. In Slide Master view, modify the font style of the slide title (you choose the font style, size, and enhancements you prefer). You can choose to change the color of the font to better match the background style you selected.
10. Create a logo to appear on every slide in the presentation except the title slide. The logo can consist of a simple shape such as a circle or a triangle containing the initials of the community center (e.g., ACC). In PowerPoint, you use the same procedure as in Word to draw a shape and then fill it with text. Position the logo in the top or bottom right corner of the screen.
11. Review the presentation and reset the layout where needed on specific slides. Note that you may also need to reapply the slide layout to slides imported from Word. To do so, click the Layout button in the Slides group, and then click Title and Content.
12. Print the presentation as handouts containing six slides to the page, save the presentation, and then close the presentation and exit PowerPoint and Word.
Step by Step Answer:

This question has not been answered yet.
You can Ask your question!


New Perspectives Portfolio Projects For Business Communication
ISBN: 9781439037461
1st Edition
Authors: Carol M. Cram
